Thứ Hai, 15 tháng 10, 2018

Vận dụng phạm trù "Cái chung, cái riêng" trong lập trình (bản sửa ngày 15/10/2018)

Hẳn chúng ta còn nhớ, khi chúng ta mới lập trình, chúng ta chưa làm mọi thứ theo cách riêng của chúng ta. Các developer thường xây dựng các hàm riêng mà không "buồn" kiểm tra xem hàm đó đã có trong thư viện chung hay chưa, hoặc đã có ai đó đã viết hàm đó hay chưa. Kết quả là sau khi dự án kết thúc, có rất nhiều đoạn code trùng lặp nhau về mặt chức năng mà thay vào đó có thể tách ra làm các hàm chung. Điều này làm cho toàn bộ mã nguồn dự án phình lên, khó kiểm soát và hình thành nên cái gọi là “rác mã nguồn”…

Qua một thời gian khi chúng ta có kinh nghiệm, chúng ta thường tư duy về “cái chung” nhiều hơn. Chúng ta sẽ thiết kế làm sao để các module có độ dính kết chặt chẽ cao (cohesion), có ảnh hưởng đến nhau ít nhất có thể (loose coupling) và chia sẻ tối đa phần chung (các thư viện, các tài nguyên ảnh…).

Một kiến trúc sư sẽ cố gắng đưa ra một tầm nhìn xa hơn, cố gắng đưa ra “cái chung” là các thư viện đã dùng ở các dự án cũ, hoặc sau khi phân tích yêu cầu bài toán sẽ quyết định tách ra một module chung để từ đó chia sẻ cho các module khác. Rõ ràng “cái chung” có nhiều ưu điểm hơn “cái riêng”. Đây chính là xu hướng mà các dự án nguồn mở luôn hướng tới. “Cái chung”, “cái riêng” cũng được đưa vào lập trình hướng đối tượng trong đó Interface, Abstract Class là các “cái chung”, các lớp kế thừa nó là “cái riêng”, “cái cụ thể”.

Liệu có một viễn cảnh nào mà “cái chung” được phát huy tối đa trong kiến trúc phần mềm. Chắc chắn là không? Tại sao vậy? Nếu mọi thứ phụ thuộc quá nhiều vào “cái chung” như thư viện, tài nguyên… thì khi có một lỗi xảy ra đặc biệt là ở module nhỏ ít quan trọng, nó sẽ kéo theo sự sụp đổ ở các module khác quan trọng hơn… và hình thành nên hiệu ứng domino. Như vậy các kiến trúc sư sẽ cần phải thận trọng khi thiết kế. Khi quyết định tách ra “cái chung” cần xác định tầm quan trọng thực sự của “cái chung” đó, cũng như quan hệ của nó với các phần khác ra sao. "Cái riêng" cũng không phụ thuộc quá nhiều vào "cái chung". Thí dụ nếu chức năng "Upload" không hoạt động, thì các thông tin cơ bản khác vẫn phải được cập nhật bình thường.

Trong cơ sở dữ liệu, chúng ta đều biết 4 loại chuẩn hóa dữ liệu. Mục đích để làm gì? Rõ ràng là để giảm dư thừa dữ liệu và đảm bảo tính logic được nhất quán, giảm thiểu sự phức tạp của cấu trúc dữ liệu. Đây chính là vận dụng “cái chung” khá hiệu quả vào bài toán cấu trúc dữ liệu. Nhưng chúng ta cũng lại biết có một kỹ thuật gọi là “phá chuẩn” (denormalization), có nghĩa là “cái chung” bị phá vỡ. Tại sao vậy? Vì trong một số trường hợp, phá chuẩn sẽ tăng hiệu suất chương trình và làm đơn giản hóa công việc, giảm thiểu nỗ lực viết code do quá nhiều liên kết giữa các bảng, tức là liên kết giữa các “cái chung” và “cái riêng”. Nhưng có phải là lúc nào cũng nên “phá chuẩn” không? Câu trả lời là không vì còn phụ thuộc vào mô hình dòng chảy dữ liệu, giống như không phải con đường nào cũng cho phép rẽ trái hoặc rẽ phải. Nếu như nhận thấy việc làm dư thừa dữ liệu không đáng kể thì chúng ta có thể phá chuẩn ở một số liên kết…, tức là tập trung xử lý vào những “cái riêng” và cắt đứt quan hệ với “cái chung”. Như vậy xử lý vấn đề “cái chung”, “cái riêng” trong lập trình cần đòi hỏi sự khéo léo và sáng tạo của những người thiết kế.

Một lưu ý nữa là nếu chúng ta chỉ tư duy “cái chung” thì sẽ không có sự sáng tạo nào được đưa ra, sẽ không có sự đột phá cho các phiên bản tiếp theo. Các lập trình viên mới sẽ phải đi theo con đường cũ của các lập trình viên đi trước vì tất cả đều đã được “dọn sẵn” như thư viện chung, tài nguyên chung…Là một Project Manager, bạn phải khơi mào sự sáng tạo từ các tư duy “cái riêng” của các lập trình viên.

Còn bạn, bạn sẽ nghĩ sao về điều này?

Thứ Bảy, 14 tháng 10, 2017

Convert DB query to JSON

DECLARE @Shopping xml;
SET @Shopping = (SELECT ExpenseDate, ExpenseAmount, c.CategoryName, ExpenseDesc
FROM SB_ExpenseItems e
JOIN SB_ExpenseCategories c on (c.CategoryID = e.CategoryID)
FOR XML path, root)

--Ref: https://www.codeproject.com/Articles/815371/Data-Parsing-SQL-to-JSON
-- Function for Conversion | XML to JSON

SELECT Stuff( 
  (SELECT * from 
    (SELECT ',
    {'+ 
      Stuff((SELECT ',"'+coalesce(b.c.value('local-name(.)', 'NVARCHAR(MAX)'),'')+'":"'+
                    b.c.value('text()[1]','NVARCHAR(MAX)') +'"'
             
             from x.a.nodes('*') b(c) 
             for xml path(''),TYPE).value('(./text())[1]','NVARCHAR(MAX)')
        ,1,1,'')+'}'
   from @Shopping.nodes('/root/*') x(a) 
   ) JSON(theLine) 
  for xml path(''),TYPE).value('.','NVARCHAR(MAX)' )
,1,1,'')

Thứ Năm, 8 tháng 5, 2014

Problem "Container does not stretch to fit floated contents" and how to use ClearFix technique to solve it?


Getting this problem?


Problem: A parent div with child element which has float property affects the parent div or makes it disappear.

Collapsing and Clearfix
One typical issue when using floats, is that parent elements don’t resize to fit their floated children. That makes sense, as they are removed from the normal flow. The solution to this is usually through a technique called Clearfix hack. A clearfix is a technique for an element to automatically clear after itself, thus preventing collapse.

Hack-free approach
Overflow: hidden is very popular method to clear floats without adding extra markup. But it becomes undesirable in few circumstances where placing the absolute positioned element, then it cuts off the element. So we can make use of different methods.


Normally, you can apply something like the following to the outer div:

  1. height: 1%; overflowhidden;  

In most modern browsers, the container will now stretch to fit the floated contents.

Clear Parent Element In CSS Using Clearfix
In some circumstances, especially when support for ancient browsers is required, there’s also a generally trouble-free hack.

The clearfix hack is used to clear floated divisions (divs) without using structural markup. 


  1. /* new clearfix */  
  2. .clearfix:after {  
  3.     visibilityhidden;  
  4.     displayblock;  
  5.     font-size: 0;  
  6.     content" ";  
  7.     clearboth;  
  8.     height: 0;  
  9.     }  
  10. * html .clearfix             { zoom: 1; } /* IE6 */  
  11. *:first-child+html .clearfix { zoom: 1; } /* IE7 */  

Yes it’s ugly, but it works very well, enabling designers to clear floats without hiding overflow and setting a width or floating (nearly) everything to get the job done.

Now simply add:
  1. class="clearfix"  

Note: Some people uses the clearfix technique in slightly different way, for example:
  1. .clearfix:after {  
  2.      content".";   
  3.      displayblock;   
  4.      height: 0;   
  5.      clearboth;   
  6.      visibilityhidden;  
  7. }  

Notice the line containing the content: "."; property. I have found that the period (or dot) specified in quotes has a nasty tendency to break certain layouts. By adding a literal dot after the .clearfix division (i.e., via the .clearfix:after selector), the clearfix hack creates a stumbling block for certain browsers. And not just for Internet Explorer — depending on the layout, even Firefox will choke a layout upon tripping on an :after-based pseudo-dot.

Use a space instead of a dot to prevent breaking layouts
The solution to this subtle design chaos? Replace the literal dot with a single blank space: "content: " "; — this trick has proven successful so consistently that I now use it as the default property in every clearfix hack.

References:

Thứ Bảy, 26 tháng 4, 2014

How to make a resizable TextArea with resizer handle bar?


There is already a good JQuery plugin for adding a grippie handle at the bottom of TextArea. Like below:


It works pretty good in every browsers. I believe it is the simplest sample. You can find such sample named "ResizableTextArea.html" in the attached source code.

However, when putting it into your code, make sure it is well tested in different test cases. There are 2 main test cases you have to fix immediately:

  1. When resize the browser window, the handle bar doesn't auto resize!
  2. When resize the TextArea by dragging the south-east icon, the handle bar doesn't auto resize!

To resolve this, I implemented a second sample named "ResizableTextArea2.html" using JQuery-ui plugin. It works pretty well and the good thing is that you can replace any handle you like through CSS. Only drawback to this sample is that, it's quite not good looking to dock the handle bar to bottom of TextArea that is already affected by jquery ui css. 

To resolve problem of sample2, I went on with more simple sample by using mousemove event handler. Personally, I prefer the last solution because it's quite simple with native JQuery and will not create any conficts. If you want to go with sample2, you'll have to do a lot of customization for JQuery-ui plugin. It's daunting task that I don't want to risk my tremendous efforts for such task of litte value. Sometimes, enough is better! :-)

Download source code here: Resizable TextArea with handle bar

Happy Coding,
Henry Pham,


Thứ Sáu, 18 tháng 4, 2014

Best Practices for SEO-Friendly optimization

These SEO tips have helped many e-commerce websites increase sales and revenue by large multiples, and can help you boost sales:
  • HTML easily parsed by search spiders
  • Lightweight HTML, separate from CSS
  • For e-commerce site, set title and META details per product, per page, and per category...
  • SEO friendly product links, category links, brand links, search links, and page links...
  • Automatically generated HTML sitemap and XML sitemap for Google Webmaster Tools
  • Correct use of robots.txt file, H1 through H6 tags, and NOFOLLOW attribute
  • PageRank not passed to irrelevant pages
  • Product image alt text
  • Use lists instead of paragraphs.
You can see why using Lists and Heading tags (h1, h2...h6) can increase your page ranking in eyes of Google

  • Include internal sub-headings and they should include your keyword phrase. Use heading tags for your sub-heads, and repeat your keyword phrase.
  • URL - Be short and go static. The best URLs are human readable without lots of parameters, numbers and symbols. Using technologies like mod_rewrite for Apache and ISAPI_rewrite for Microsoft, you can easily transform dynamic URLs like this http://moz.com/blog?id=123 into a more readable static version like this: http://moz.com/blog/google-fresh-factor. Even single dynamic parameters in a URL can result in lower overall ranking and indexing.
  • Prevent cache.
    A cache buster is a string of code inserted in a page or a tag to prevent browsers and proxies to fetch a file (most often an ad) from the cache.
    Using the Google cache feature makes it difficult for search engines to interpret relevancy.
    Note: Image cachebuster changes too frequently might damage SEO. The cachebuster in image urls changes too frequently, even when the image itself hasn't changed. This causes search engines to believe that the image has changed when it hasn't, which results in the images not getting indexed.

Thứ Tư, 16 tháng 4, 2014

Cross-Site-Scripting-XSS Attacking

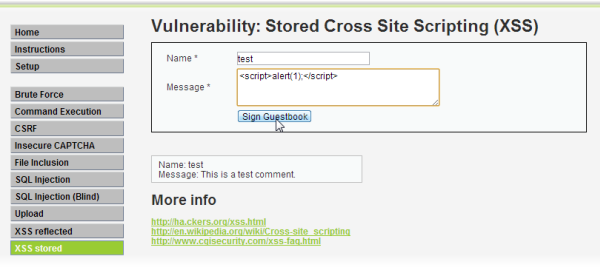
Cross-site scripting (XSS) is a type of computer security vulnerability typically found in Web applications. XSS enables attackers to inject client-side script into Web pages through form fields or URL.

XSS happens when a server accepts input from the client and then blindly writes that input back to the page. Most of the protection from these attacks involves escaping the output, so the Javascript turns into plain HTML.

Below are sequence diagrams to help figure out how XSS attacks your Web application through URL:


Example 1: 
http://example.com/unsafepage?name=Rumplestiltskin<script>alert('1')

For example have a guestbook or comment widget on your homepage and a client posts some javascript code which fx redirects you to another website or sends your cookies in an email to a malicious user or it could be a lot of other stuff which can prove to be real harmful to you and the people visiting your page.

Tip: If the website doesn't properly sanitize the input/output, an attacker could add script to a comment, which would then be displayed and executed on the computers of anyone who viewed the comment.

Example 2: 
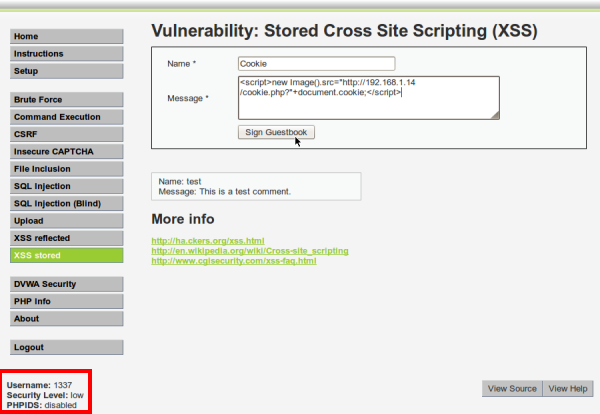
In this scenario we have an attacker who is on another computer and has access to your Web site, but not as admin. His objective is to set up a XSS attack to steal the admin session cookie, send it to him, and use it to gain access to the admin account.

Assuming that the server is running at the IP address of 192.168.1.16. The attackers computer is running Backtrack, which has the IP address of 192.168.1.14.


These are simple examples. There's a lot more to it and a lot of different types of XSS attacks.

Best Practices for avoiding XSS Attacking:
  • Understand inputs and outputs for the code you are reviewing. Dataflow analysis is a powerful mechanism for finding security bugs. Understand every source of data in the code you are reviewing as well as where the data will end up. How much trust you are willing to give the source as well as the ultimate destination of the data both have a major impact on the level of data validation the code should have.
  • Your application needs to ensure that all variable output in a page is encoded before being returned to the end user. Encoding variable output substitutes HTML markup with alternate representations called entities. The browser displays the entities but does not run them. For example,

Thứ Ba, 15 tháng 4, 2014

How to keep footers at the bottom of the page

Description: This trick is not new, but it's always helpful for any people who want to design a docking footer with their Web site. Thank author (Mathew James Taylor) for very good article. Also pass on thank-you words to Mr. Pham Dinh Truong for good workaround with middle layer (see comment below this article).

Please note that you run into same problem even you use table to replace div!

When an HTML page contains a small amount of content, the footer can sometimes sit halfway up the page leaving a blank space underneath. This can look bad, particularly on a large screen. Web designers are often asked to push footers down to the bottom of the viewport, but it's not immediately obvious how this can be done.
A diagram describing the footer problem and the ideal solution
When I first ditched tables for pure CSS layouts I tried to make the footer stay at the bottom but I just couldn't do it. Now, after a few years of practice I have finally figured out a neat way to do it. My method uses 100% valid CSS and it works in all standards compliant browsers. It also fails gracefully with older browsers so it's safe to use on any website.

The main features

  • Works in all modern, standards compliant browsers

    Compatible browsers: Firefox (Mac & PC), Safari (Mac & PC), Internet Explorer 7, 6 & 5.5, Opera and Netscape 8
  • Fails gracefully on older browsers

    Older non-standards compliant browsers position the footer under the content as per normal. We can't help it if people are using an out of date browser, all we can do is reward people who have upgraded by giving them a better browsing experience through progressive enhancement.
  • Longer content pushes the footer off the page

    On long pages with lots of content the footer is pushed off the visible page to the very bottom. Just like a normal website, it will come into view when you scroll all the way down. This means that the footer isn’t always taking up precious reading space.
  • 100% valid CSS with no hacks

    The CSS used in this demo is 100% valid and contains no hacks.
  • No JavaScript

    JavaScript is not necessary because it works with pure CSS.
  • iPhone compatible

    This method also works on the iPhone and iPod Touch in the mobile Safari browser.
  • Free to download

    Simply save the source code of my demo page and use it however you like.

There is only one limitation

You must set the height of the footer div to something other than auto. Choose any height you like, but make sure the value is specified in pixels or ems within your CSS. This is not a big limitation, but it is essential for this method to work correctly.
If you have a lot of text in your footer then it's also a good idea to give the text a bit more room at the bottom by making your footer a bit deeper. This is to cater for people who have their browser set to a larger text size by default. Another way to solve the same problem is to set the height of the footer in em units; this will ensure that the footer grows in size along with the text. If you only have images in your footer than there's nothing to worry about – just set your footer height to a pixel value and away you go.

So how does it work?

It's actually not that complicated. There are two parts to it - the HTML and the CSS.

The HTML div structure

  1. <div id="container">  
  2.    <div id="header"></div>  
  3.    <div id="body"></div>  
  4.    <div id="footer"></div>  
  5. </div>  

There are only four divs required for this to work. The first is a container div that surrounds everything. Inside that are three more divs; a header, a body and a footer. That's it, all the magic happens in the CSS.

The CSS
  1. html,  
  2. body {  
  3.    margin:0;  
  4.    padding:0;  
  5.    height:100%;  
  6. }  
  7. #container {  
  8.    min-height:100%;  
  9.    position:relative;  
  10. }  
  11. #header {  
  12.    background:#ff0;  
  13.    padding:10px;  
  14. }  
  15. #body {  
  16.    padding:10px;  
  17.    padding-bottom:60px;   /* Height of the footer */  
  18. }  
  19. #footer {  
  20.    position:absolute;  
  21.    bottom:0;  
  22.    width:100%;  
  23.    height:60px;   /* Height of the footer */  
  24.    background:#6cf;  
  25. }  

And one simple CSS rule for IE 6 and IE 5.5:
  1. #container {  
  2.    height:100%;  
  3. }  

The html and body tags
The html and body tags must be set to height:100%; this allows us to set a percentage height on our container div later. I have also removed the margins and padding on the body tag so there are no spaces around the parameter of the page.

The container div

The container div has a min-height:100%; this will ensure it stays the full height of the screen even if there is hardly any content. Many older browsers don't support the min-height property, there are ways around it with JavaScript and other methods but that is out of scope for this article. The container div is also set to position:relative; this allows us to absolutely position elements inside it later.

The header div

There is nothing unusual with the header. Make it whatever color and size you like.

The body div

The body is quite normal too. The only important thing is it must have a bottom padding that is equal to (or slightly larger than) the height of the footer. You can also use a bottom border if you prefer but a margin won't work.

The footer div

The footer has a set height in pixels (or ems). The div is absolutely positioned bottom:0; this moves it to the bottom of the container div. When there is little content on the page the container div is exactly the height of the browser viewport (because of the min-height:100%;) and the footer sits neatly at the bottom of the screen. When there is more than a page of content the container div becomes larger and extends down below the bottom of the viewport - the footer is still positioned at the bottom of the container div but this time you need to scroll down to the end of the page to see it. The footer is also set to width:100%; so it stretches across the whole page.

The IE 6 & IE 5.5 CSS

Older versions of Internet Explorer don't understand the min-height property but lucky for us the normal height property behaves exactly the same way in these old Microsoft browsers, that is, it will stretch to 100% height of the viewport but if the content is longer it will stretch even further. We simply expose this 100% height rule to Internet Explorer only by using IE conditional comments. View the source on the demo to see how this is done.

So there you have it... A simple, valid way to make the footer get down! I hope you find it useful.